

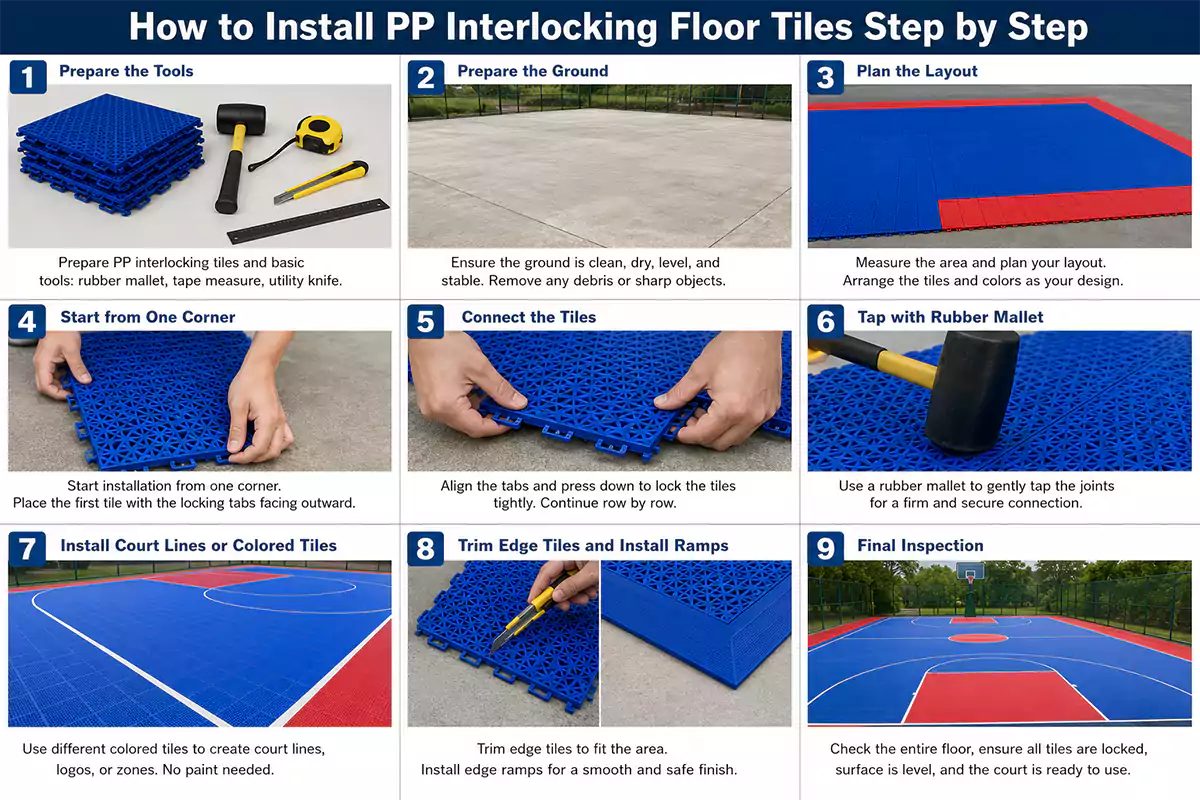

How to Install PP Interlocking Floor Tiles Step by Step
How to Install PP Interlocking Floor Tiles Step by Step,Installing PP interlocking floor tiles is one of the easiest and most cost-effective ways to create a durable sports court or recreational surface. Unlike traditional flooring systems, modular PP tiles require no glue or specialized tools, making installation fast and hassle-free.
Whether you’re building a basketball court, pickleball court, volleyball court, badminton court, gym floor, playground, or backyard sports area, this guide will walk you through the installation process step by step.
Why Choose PP Interlocking Floor Tiles?
PP (Polypropylene) interlocking floor tiles are designed for quick installation and long-lasting performance. They are widely used for indoor and outdoor sports facilities because they offer:
- Easy DIY installation
- No adhesive required
- Weather-resistant and UV-resistant
- Excellent drainage for outdoor use
- Shock absorption for player comfort
- Anti-slip surface
- Easy maintenance
- Replaceable individual tiles
Because of their modular design, damaged tiles can be replaced without removing the entire floor.
Tools You’ll Need
Before installation, prepare the following:
- PP interlocking floor tiles
- Rubber mallet (optional)
- Tape measure
- Chalk line or string
- Utility knife or tile cutter (for edge trimming)
- Expansion edging or ramps (optional)
Most installations require only basic hand tools.
Step 1: Prepare the Ground
A smooth, stable base is essential for a long-lasting floor.
Suitable base materials include:
- Concrete
- Asphalt
- Compacted gravel
- Existing hard court
- Wooden platform (indoor)
The surface should be:
- Clean
- Dry
- Level
- Free of debris
- Properly drained
Avoid installing directly on soft soil or uneven ground.
Step 2: Plan the Layout
Measure the installation area carefully.
Calculate the number of tiles needed:
Area ÷ Tile Size = Quantity Required
Before snapping the tiles together, lay several rows loosely to confirm the layout.
If using multiple colors for court markings or logos, arrange them according to your design plan.
Step 3: Start from One Corner
Begin installation at one corner of the court.
Place the first tile with the locking tabs facing outward.
Continue connecting tiles row by row.
The interlocking system allows each tile to snap securely into place without glue.
Step 4: Connect the Tiles
Align the locking tabs with the adjacent tile.
Press firmly by hand.
If necessary, gently tap the joints using a rubber mallet until the tiles lock completely.
Repeat this process until the entire surface is covered.
Step 5: Install Court Lines or Colored Tiles
Many modular flooring systems use different colored tiles instead of painted lines.
Popular court colors include:
- Blue
- Green
- Red
- Gray
- Orange
- Yellow
Simply replace the corresponding tiles according to the court layout.
This method creates permanent court markings that never peel or fade like paint.
Step 6: Trim Edge Tiles
If the installation area does not perfectly match the tile dimensions, trim the edge tiles.
Measure carefully before cutting.
Use:
- Utility knife
- Circular saw
- Jigsaw
Always wear protective equipment while cutting.
Step 7: Install Edge Ramps
Install edge ramps or corner pieces around the perimeter.
Benefits include:
- Improved appearance
- Reduced trip hazards
- Easier access for wheelchairs and carts
- Better protection for tile edges
Edge accessories simply snap onto the outer tiles.
Step 8: Final Inspection
Walk across the entire floor and check that:
- Every tile is fully locked
- No gaps exist
- Surface is level
- Court markings are correct
- Expansion gaps remain around walls if installed indoors
Your new sports floor is now ready for use.
Installation Tips
For the best results:
- Leave a small expansion gap around walls.
- Install in dry weather.
- Avoid forcing misaligned tiles together.
- Store tiles flat before installation.
- Follow the manufacturer’s expansion recommendations.
Proper installation helps maximize the flooring’s lifespan.
Common Installation Mistakes
Avoid these common errors:
Installing on an Uneven Surface
An uneven base may cause movement or uneven joints.
Forgetting Expansion Space
Outdoor temperatures cause plastic flooring to expand and contract.
Skipping Surface Cleaning
Dust and debris can prevent proper tile engagement.
Using Excessive Force
The locking system should click together naturally.
How Long Does Installation Take?
Installation speed depends on the project size.
| Court Size | Estimated Installation Time |
|---|---|
| Backyard Court | 2–4 hours |
| Pickleball Court | 4–6 hours |
| Basketball Half Court | 1 day |
| Full Basketball Court | 1–2 days |
A professional installation team can complete large projects even faster.
Maintaining Your PP Interlocking Floor
Maintenance is simple.
Regular care includes:
- Sweeping leaves and dirt
- Washing with clean water
- Using mild detergent for stains
- Removing standing debris from drainage holes
- Inspecting loose tiles periodically
Individual damaged tiles can be replaced in minutes.
Frequently Asked Questions
Can I install PP interlocking floor tiles myself?
Yes. Most homeowners and facility managers can complete installation without professional assistance.
Do I need glue?
No. PP interlocking floor tiles use a snap-fit locking system and require no adhesive.
Can they be installed outdoors?
Yes. High-quality PP tiles are UV-resistant, weather-resistant, and designed for outdoor sports courts.
Can I remove and reinstall the tiles?
Yes. One of the biggest advantages of modular flooring is that it can be disassembled and relocated when needed.
How long do PP floor tiles last?
With proper installation and maintenance, premium PP interlocking floor tiles typically last 8–15 years, depending on usage, climate, and product quality.
Conclusion
Installing PP interlocking floor tiles is a fast and efficient way to build a professional-quality sports surface without the complexity of traditional flooring systems. By preparing a stable base, planning the layout, and following the correct installation steps, you can create a durable court that performs well for years.
Whether you’re upgrading a backyard, school playground, commercial gym, or full-size sports court, modular PP flooring offers an attractive combination of easy installation, low maintenance, and long-term value.